Dragon Scale Fingerless Mitts: Free Crochet Pattern
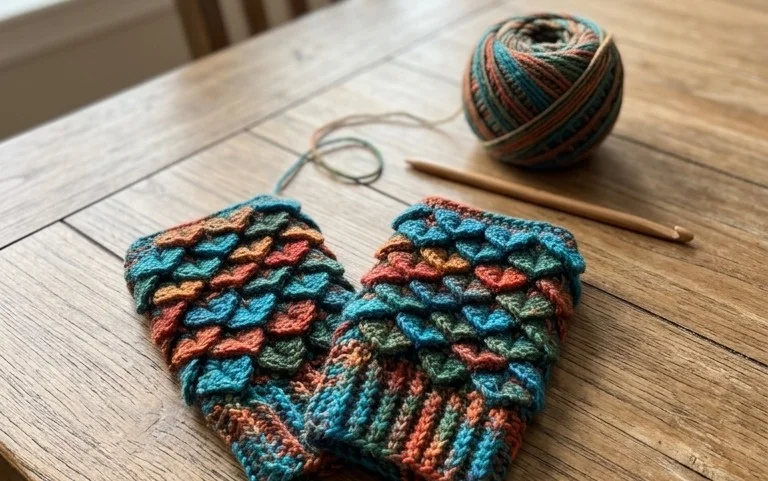
These textured fingerless mitts feature overlapping rows that mimic the look of reptilian skin, providing a warm and snug fit that keeps your hands agile. The unique construction relies on the crocodile stitch, which builds depth and thickness into each piece while remaining comfortable against the skin. You will gain confidence working with post stitches to create those signature scales, resulting in a project that looks complex but follows a logical, repeating flow. Making these is a great way to use up half-skeins of soft merino wool, and the finished accessories offer a tactile, cozy feel for chilly autumn afternoons spent reading or working.
Why You’ll Love This Pattern
This beginner-friendly crochet coaster set uses basic stitches to create a durable, heat-resistant surface for your mugs and glasses. Working in simple rounds allows you to practice consistent tension while producing a practical home accessory. You can complete one coaster in less than thirty minutes, making this an ideal project for using up small amounts of leftover cotton yarn. Because the pattern relies on standard increases, it serves as an excellent introduction to circular construction without the complexity of more advanced shaping.
I finished a set of four coasters in one afternoon. The instructions were very clear and the circles lay completely flat on my coffee table without any curling.
— Sarah, hobbyist crocheter
Pattern Overview & Skill Level
- Skill Level: Beginner
- Approximate Time: 25 minutes per coaster
- Construction: Worked in continuous rounds from the center outward
- Finished Dimensions: 4 inches in diameter
Materials & Supplies Needed
- Yarn: Worsted weight (#4) 100% cotton yarn, approximately 15 yards per coaster. Cotton is preferred for its heat resistance and absorbency.
- Hook Size: 5.0 mm (H-8) crochet hook.
- Notions: Tapestry needle for weaving in ends, a pair of scissors, and a locking stitch marker to track the start of each round.
- Yarn Substitutions: Acrylic yarn may be substituted but will not handle heat from hot mugs as well as cotton. Wool is a viable option but requires hand washing to prevent felting.
Stitch Guide & Abbreviations (US Terms)
- ch = chain
- st/sts = stitch/stitches
- sl st = slip stitch
- sc = single crochet
- inc = 2 single crochet in the same stitch
- MR = magic ring (a technique for starting a circle by crocheting over a loop of yarn)
Step-by-Step Pattern Instructions
The coaster is worked in a continuous spiral. Place a stitch marker in the first stitch of every round to keep your place.
Coaster Body
- Rnd 1: Start with a MR, work 6 sc into the ring. (6 sts)
- Rnd 2: Work 2 sc in each sc around. (12 sts)
- Rnd 3: *1 sc in next st, inc in next st; repeat from * around. (18 sts)
- Rnd 4: *1 sc in each of next 2 sts, inc in next st; repeat from * around. (24 sts)
- Rnd 5: *1 sc in each of next 3 sts, inc in next st; repeat from * around. (30 sts)
- Rnd 6: *1 sc in each of next 4 sts, inc in next st; repeat from * around. (36 sts)
Finishing
Once you reach the end of Round 6, work one slip stitch into the next stitch to smooth out the edge of the circle. Cut the yarn, leaving a six-inch tail for weaving. Pull the tail through the final loop and use your tapestry needle to weave the end securely into the back of the coaster. Trim any excess yarn close to the fabric.
Care & Washing Instructions
- Machine wash on a gentle cycle in cold water using a mild detergent.
- Lay the coaster flat on a clean towel to air dry, reshaping it with your hands while damp.
- If the edges begin to curl over time, lightly steam the coaster or mist it with water and press flat with a heavy book until dry.
Pro Tips & Common Mistakes to Avoid
Maintain consistent tension throughout the project by keeping your yarn feed smooth. If your coaster begins to cup like a bowl, your tension is likely too tight; try going up a hook size. If the edges are wavy or ruffled, your tension is too loose or you have added too many stitches, meaning you should double-check your increase counts at the end of each round. To weave in your ends invisibly, follow the path of the yarn under the loops on the back side of the work for at least one full inch.
Frequently Asked Questions
Can I make the coaster larger?
Yes, you can continue the pattern by adding more rounds. Follow the increase logic by adding one additional single crochet between each increase in every subsequent round, which adds 6 stitches per round.
Is cotton yarn necessary for this project?
Cotton is strongly recommended because it does not melt when exposed to high temperatures from hot mugs. Synthetic fibers like acrylic may soften or lose shape when placed under hot drinkware.
How do I keep my circle from having a visible seam?
This pattern uses continuous rounds, which naturally eliminates the visible seam created by joining at the end of every row. Just ensure you move your stitch marker up every time you begin a new round.
Can I sell the finished coasters?
You are welcome to sell items made from this pattern. I ask that you credit me as the designer when listing your finished goods online.
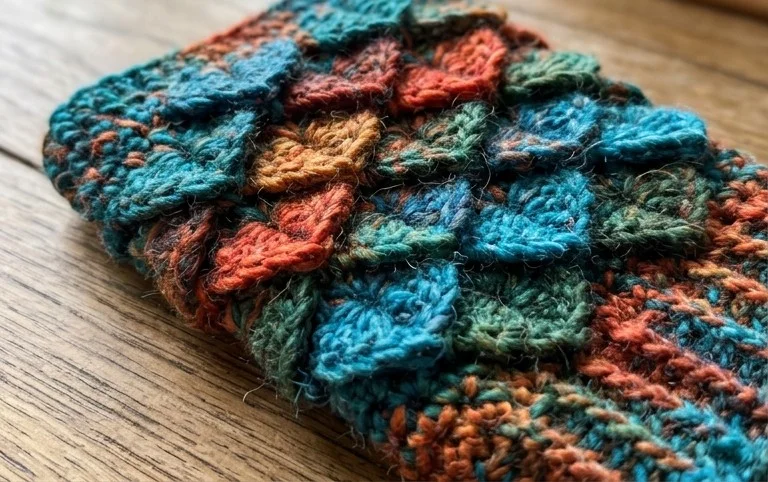
Your finished mitts serve as a cozy accessory that keeps your hands warm while leaving your fingers free for tasks like typing or holding a coffee mug. Consider working these in a solid jewel tone to make the texture stand out, or try a variegated yarn to add subtle color shifts to each individual scale. Upload a photo of your completed project to Instagram or Pinterest so other makers can see your work, and feel free to browse the rest of our pattern library for more winter garment ideas.